Vzdrževanje in varnostni nasveti za uporabo pnevmatskih vrtalnih strojev
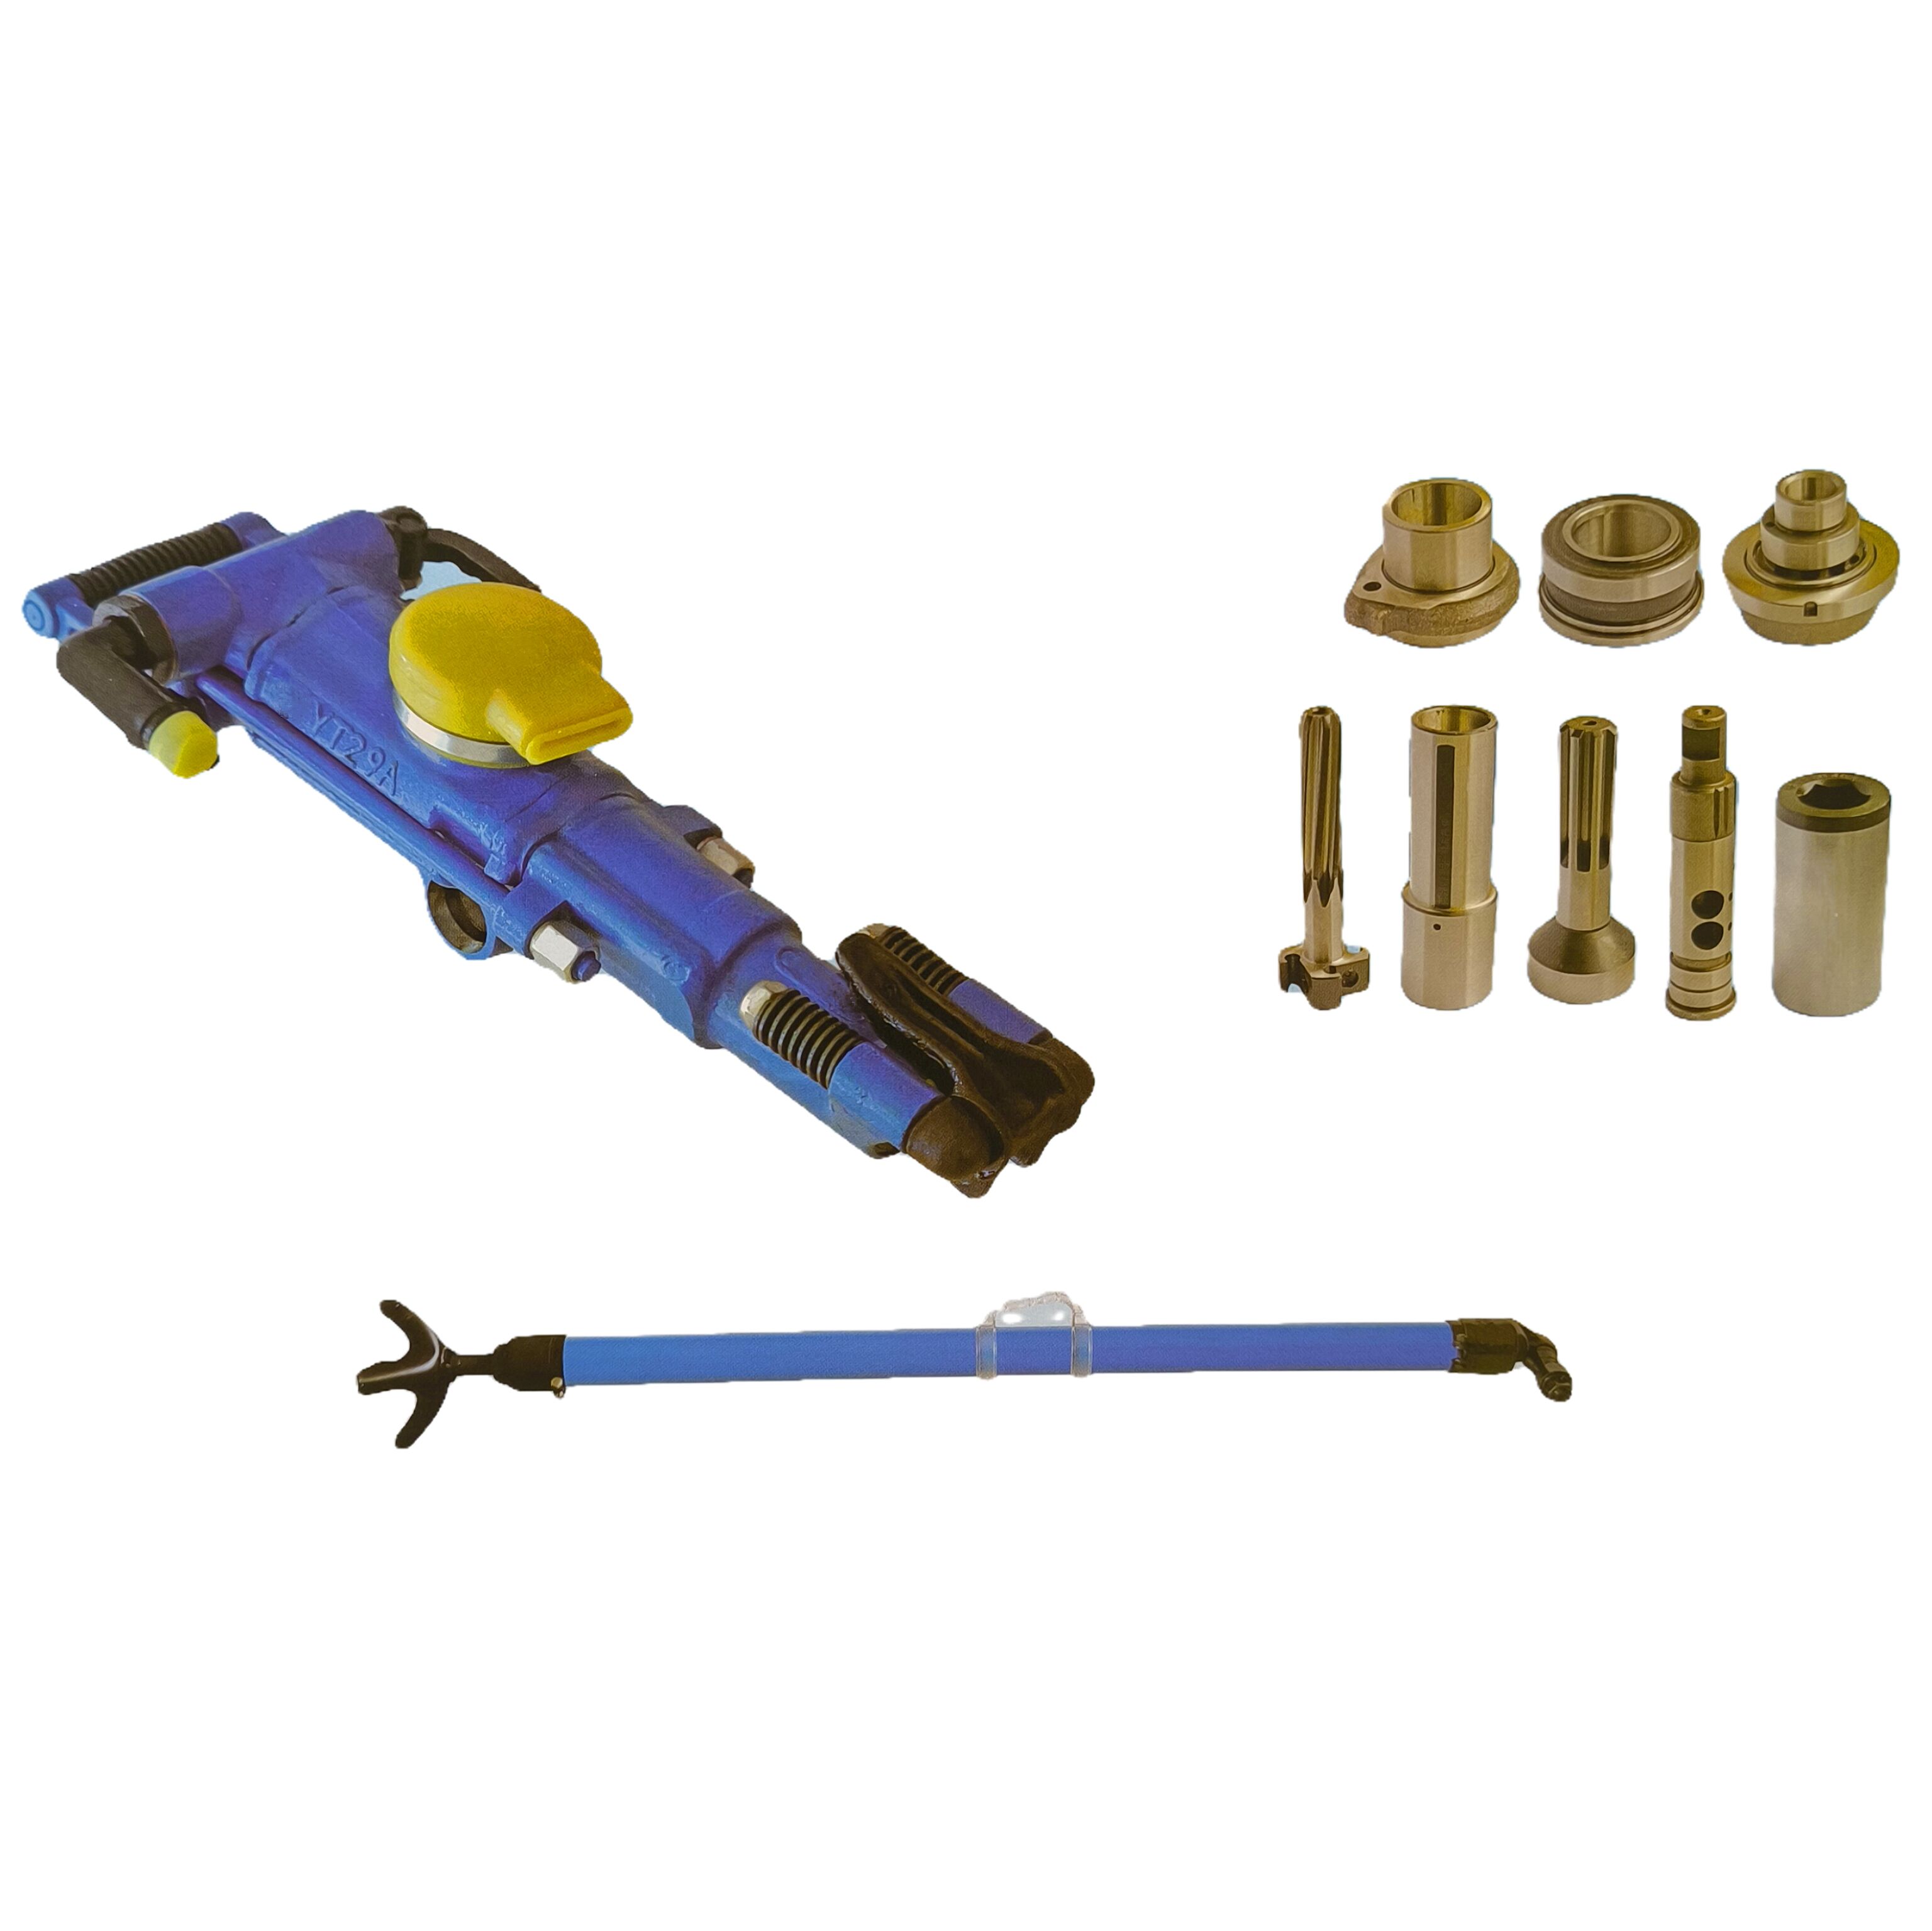
Pnevmatski skalni vrtalni stroji so močna orodja, ki se uporabljajo v gradbeništvu, rudarstvu in izkopavanju za prebijanje trdih materialov, kot so skale, beton in kamni. Njihova sposobnost dostave močnega udarnega sile s stisnjenim zrakom jih naredi nepogrešljiva za zahtevna opravila, vendar ta moč prinaša tudi nevarnosti. Brez ustrezne vzdrževanja pnevmatski skalni vrtalni stroji lahko pride do okvar, kar zmanjša učinkovitost in podaljša čas mirovanja. Brez ukrepov varnosti pa lahko povzročijo hude poškodbe operaterjem. Ta priročnik povzema osnovne nasvete za vzdrževanje in varnost, kako ohraniti pnevmatske ročne vrtalne stroje delujoče zanesljivo in zaščititi uporabnike.
Zakaj sta za pnevmatske ročne vrtalne stroje pomembna vzdrževanje in varnost
Pnevmatski ročni vrtalni stroji delujejo v težkih okoljih – izpostavljeni so prahu, vibracijam in intenzivni uporabi. Sčasoma lahko obraba poškoduje komponente, kot so bati, cevi in vrtalni glave, kar vodi v zmanjšano zmogljivost ali nenadne okvare. Redno vzdrževanje preprečuje te težave, podaljša življenjsko dobo orodja in zagotavlja enakomerno zmogljivost.
Varnost je enako pomembna. Pnevmatski skalni vrtalni stroji ustvarjajo intenzivno vibracijo, glasen hrup in tok visokotlačnega zraka, ki lahko povzročijo poškodbe, kot so vibracijski sindrom roke in roke, izguba sluha ali nesreče zaradi letenja odpadnega materiala. Sledenje varnostnim smernicam zmanjša te tveganja in tako zaščiti operaterje in osebe v bližini.
Z združevanjem ustrezne vzdrževalne prakse in stroge varnostne prakse lahko ekipe ohranijo učinkovito delovanje pnevmatskih skalnih vrtalnih strojev, zmanjšajo stroške popravil ali izpadov ter ustvarijo varnejše delovno okolje.
Osnovni nasveti za vzdrževanje pnevmatskih skalnih vrtalnih strojev
Redno vzdrževanje ohranja pnevmatske skalne vrtalne stroje v najboljšem stanju. Sledite tem korakom, da preprečite okvare in zagotovite dolgo življenjsko dobo:
1. Pregledi pred uporabo
Pred začetkom dela temeljito pregledajte pnevmatski skalni vrtalni stroj, da odkrijete morebitne težave že v zgodnji fazi:
- Preverjanje cevi in priključkov : Preverite zračne cevi in spoje za razpoke, puščanje ali ohlapne priključke. Tudi majhne puščave zmanjšujejo zračni tlak, kar oslabi moč vrtalke in povzroči izgubo energije. Poškodovane cevi takoj zamenjajte – nikoli ne uporabljajte traku za začasno popravilo.
- Preverite vrtalno glavo : Preverite, da je glava ostra, nepoškodovana in varno pritrjena. Tupa ali poškodovana glava preveč obremenjuje motor vrtalke in povzroča neenakomerno delo. Privijte sponko ali vrat glave, da preprečite odletavanje med uporabo.
- Preverite ročaje in zaščitne ovoje : Preverite, da so ročaji trdni in brez razpok. Protivibracijski ročaji ali zaščitne ovoje (če so prisotne) morajo biti v dobrem stanju, da zmanjšajo utrujenost uporabnika in tveganje za poškodbe.
- Preverite za ohlapne dele : Poiščite ohlapne vijake, matice ali kovine. Vibracije med uporabo lahko sprostijo komponente, zato vse ohlapne dele privijte.
Kratka 5-minutna preverjanje pred vsako uporabo lahko prepreči dragocene okvare ali nesreče.
2. Pravilno maščenje
Pnevmatski ročni vrtalniki potrebujejo stisnjen zrak, ki posuši notranje komponente, kot so baterije in valjci. Brez maščobe se kovinski deli trenijo skupaj, kar povzroči obrabo in pregrevanje.
- Uporabite pravo olje : Vedno uporabite visokokakovostno olje za pnevmatska orodja (razred ISO 32 ali 46). Nikoli ne uporabite motorne olje ali drugih nadomestkov, saj lahko poškodujejo tesnila ali zamašijo notranje kanale.
- Mažite pred uporabo in med uporabo : Pred priključkom cevi v zračni priključek dodajte 5–10 kapljic olja. Za daljšo uporabo (več kot 1 ura) vsako uro dodajte nekaj kapljic, da ohranite maščobo na komponentah.
- Preverite zalogovnike olja : Nekateri pnevmatski ročni vrtalniki imajo vgrajene zalogovnike olja. Preverjajte jih vsak dan, da zagotovite, da so polni in čisti. Po potrebi dolijte sveže olje.
Ustrezna maščoba zmanjša trenje, podaljša življenjsko dobo komponent in zagotavlja gladko delovanje vrtalnika.
3. Vzdrževanje zračnega napajalnega sistema
Pnevmatski rovarji potrebujejo čist, suho in primerno stisnjeno zrak iz kompresorja. Slabo vzdrževan zračni sistem škoduje tako rovarju kot njegovim zmogljivostim:
- Preveri tlak kompresorja : Zagotovite, da kompresor zagotavlja tlak, priporočan od proizvajalca rovarja (običajno 90–120 psi). Prenizak tlak zmanjša moč; previsok pa lahko poškoduje notranje dele.
- Čisti zračne filtre : Zračni filtri na kompresorju ujamejo prah in odpadke. Začopljene filtre omejijo pretok zraka in pustijo kontaminante vstopiti v rovarja. Očistite ali zamenjajte filtre tedensko, ali pogosteje v prahih okoljih.
- Izprazni zbirnike za vlago : Vlaga v stisnjenem zraku povzroča rjavenje znotraj rovarja. Dnevno izpraznite zbirnike za vlago na kompresorju in rovarju, da preprečite nabiranje vode.
- Preveri cevi za zvitek : Zvite ali stisnjene cevi zmanjšujejo pretok zraka. Cevi položite ravno in se izogibajte vleki čez ostre robove ali težko opremo.
Dobro vzdrževan zračni sistem zagotavlja, da pnevmatski rovar dobi čist in suh zrak, ki ga potrebuje za najboljše delovanje.
4. Čiščenje in shranjevanje po uporabi
Po uporabi preprečite poškodbe zaradi prahu, vlažnosti in korozije z ustrezno čiščenjem in shranjevanjem:
- Očistite vrtalo : Uporabite krtačo ali stisnjen zrak (pri nizkem tlaku), da odstranite prah, kamnjeve čipe in odpadke z vrtalovega telesa, ročajev in zračnega vhoda. Posebno pozornost namenite hlajenju – zamašeni ventili povzročajo presegrevanje.
- Odstranite in shranite vrtalni vrelec : Odstranite vrtalni vrelec in ga očistite z žično krtačo. Vrce shranite v suhem, označenem vsebniku, da se prepreči poškodba in ohrani red.
- Podmažite pred shranjevanjem : Dodajte nekaj kapljic olja v zračni vhod in zaženite vrtalo za kratek čas (brez vretca), da se olje porazdeli po notranjih delih. To prepreči rjavenje med shranjevanjem.
- Shranite na suhem in hladnem mestu : Pnevmatska kamenorezna vrtala hranite v zaščitenem prostoru, oddaljenem od dežja, vlažnosti ali ekstremnih temperatur. Vrtala obešajte ali jih postavite na stojalo, da se izognete stiku z mokrimi tlemi.
Ustrezen sklad je zaščitil pnevmatske ročne vrtalne stroje pred poškodbami zaradi okolja in zagotovil, da bodo naslednjič pripravljeni za uporabo.
5. Redno strokovno servisiranje
Tudi z dnevnim vzdrževanjem pnevmatskih ročnih vrtalnih strojev potrebujejo strokovne preglede, da se odkrijejo skrite težave:
- Načrtujte servis vsakih 3–6 mesecev : Glede na pogostost uporabe naj kvalificiran tehnik pregleda notranje komponente, kot so bati, valji in ventili. Lahko pa zamenja obrabljene dele (npr. O-obročke, tesnila), preden pride do okvare.
- Preverjanje zmogljivosti : Strokovnjaki lahko izmerijo udarno energijo, porabo zraka in nihanje, da zagotovijo skladnost vrtala s specifikacijami proizvajalca. Prilagoditve (npr. prilagajanje časovnega zaporedja ventilov) lahko obnavljajo izgubljeno zmogljivost.
- Uvajanje varnostnih funkcij : Če ima vrtalo varnostne mehanizme (npr. zaščito pred preobremenitvijo), lahko tehnični delavci preverijo, ali delujejo pravilno.
Strokovno servisiranje podaljša življenjsko dobo pnevmatskih ročnih vrtalnih strojev in zagotavlja, da ostanejo varni za uporabo.
Ključni nasveti za varnost pri uporabi pnevmatskih bušilnih strojev
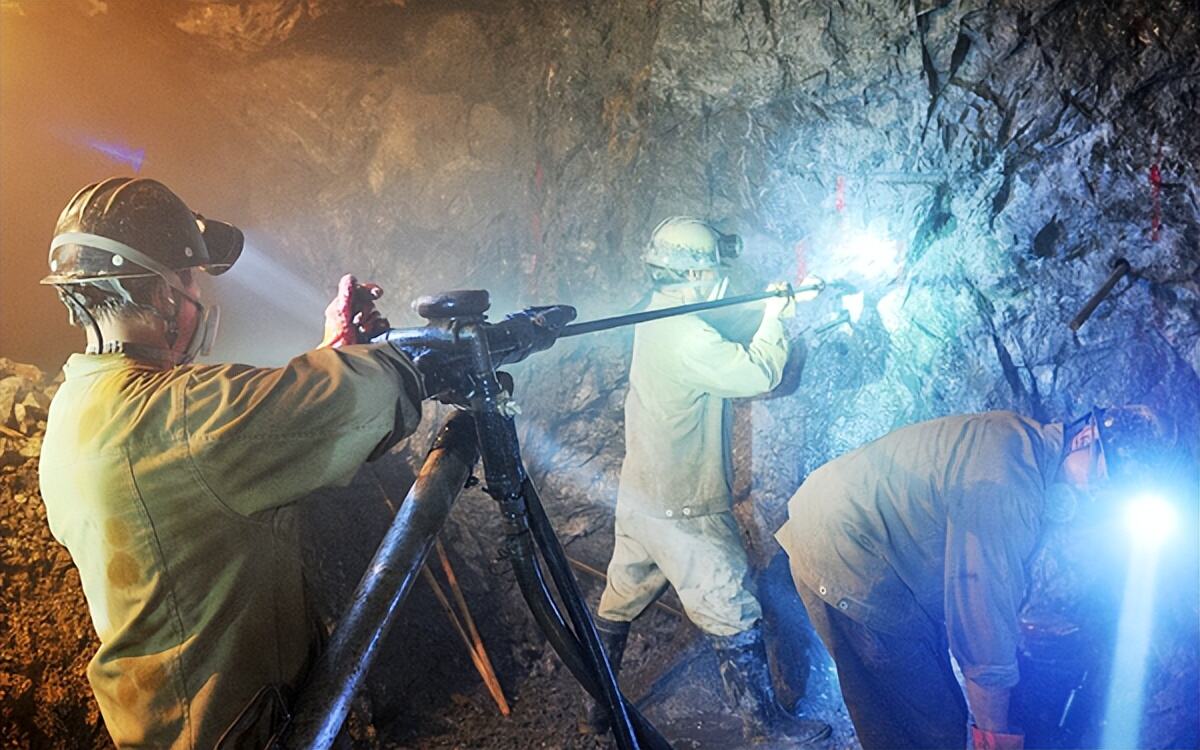
Pnevmatski bušilni stroji predstavljajo nevarnosti, kot so vibracije, hrup, letenje drobnega materiala in nevarnosti zaradi visokotlačnega zraka. Sledite tem nasvetom za varnost, da zaščitite operaterje in osebe v bližini:
1. Nosite ustrezno osebno zaščitno opremo (OZO)
OZO je nujna pri uporabi pnevmatskih bušilnih strojev. Vedno nosite:
- Varnostne očala ali obrazni ščit : Ščitijo oči pred letenjem kamnitih ostružkov, prahu in odpadnim materialom.
- Zaščita sluhu : Pnevmatski bušilni stroji proizvajajo 90–110 decibelov hrupa – kar je dovolj, da povzroči izgubo sluha. Uporabite ušesne tampončke, ušesne školjke ali oboje.
- Rožniki za težko uporabo : Zmanjšujejo izpostavljenost vibracijam in ščitijo roke pred ostrimi robovi, vročimi površinami ali letenjem odpadnega materiala. Izberite rožnike z dobrim prijemom, da ohranite nadzor.
- Cevlji s čeljustnico : Ščitijo noge pred padajočimi kamni, orodjem ali naključnim padcem bušilnega stroja.
- Prašniška maska ali dihalni aparat : V prašnih okoljih (npr. rudarjenje, rušenje) nosite masko, da preprečite vdihavanje kamnin dust, ki lahko povzroči poškodbe pljuč.
- Varnostna čelada : Obvezna v gradbeništvu ali rudarjenju za zaščito pred padajočimi predmeti.
Nikoli ne upravljajte pnevmatskega kamnoseškega vrtalnega stroja brez vseh predpisanih OZS.
2. Priprava delovnega območja
Varno delovno območje zmanjša tveganje za nesreče že pred začetkom vrtanja:
- Počistite območje : Odstranite ohlapne kamne, odpadke in ovire pri hoji (npr. kable, orodje) z delovnega območja. Osebe, ki niso vpleteni, naj bodo na razdalji vsaj 50 metrov, ali še dlje, če vrtate v zaprtih prostorih.
- Preverjanje nevarnosti : Prepoznajte skrite tveganje, kot so podzemne komunalne napeljave (cevi, kabeli) ali nestabilne kamninske formacije. Uporabite radar za predrte površine ali mape komunalnih napeljav, da se izognete trku z zakopanimi vodnimi ali drugimi linijami.
- Zavarujte delovni kos : Če vrtate beton ali kamnito maso v delavnici, pritrstite material na stabilno površino, da preprečite njegovo premikajte med vrtanjem.
- Poskrbite za prezračevanje : V zaprtih prostorih (npr. tunelih, kletih) uporabite ventilatorje za cirkulacijo zraka in zmanjšanje nabiranja prahu.
Dobro pripravljeno delovno območje zmanjša nepričakovane nevarnosti med delovanjem.
3. Varno vedenje pri delovanju
Način uporabe pnevmatskega kamenorezno vrtalnega stroja neposredno vpliva na varnost in učinkovitost:
- Vrstite vrtalo pravilno : Uporabite obe roki – eno na glavni ročaji, drugo na pomožni ročaji – da ohranite ravnovesje. Držite trdno, vendar se izogibajte pretirani sili, da zmanjšate vpliv vibracij.
- Stojte stabilno : Postavite se s stopali na širini ramen, rahlo upognjenimi koleni in telesom obrnjenim na stran vrtalnega stroja (ne neposredno za njim). Ta postopek zmanjša tveganje poškodb, če se vrtalo zatakne ali odkloni.
- Začnite počasi : Začnite vrtati z majhnim pritiskom, nato postopoma povečajte na polno moč. Surov začetek z maksimalno močjo lahko povzroči skok vrtala in izgubo kontrole.
- Izogibajte se pretiranih dosegov : Premikajte telo, ne samo roke, da prilagodite položaj vrtala. Preveč raztezanje napenja mišice in zmanjšuje ravnovesje.
- Naredite odmor : Pnevmatski kamnita vrtala ustvarjajo močno vibracijo, ki lahko pri daljši uporabi povzroči sindrom vibracij roke in roke. Naredite 5–10 minutni odmor vsakih 30 minut, da si odpočijete roke in roke.
Pravilna tehnika upravljanja zmanjša utrujenost in tveganje poškodb pri daljši uporabi.
4. Varno ravnanje z zatiki in okvarami
Zatiki ali nenadne okvare se lahko pojavijo tudi pri dobro vzdrževanih vrtalih. Sledite tem korakom, da se varno spopadete z njimi:
- Takoj ustavite vrtalo če se vrtači zaprejo ali če vrtač povzroči nenavadne zvoke (žganje, sijanje), spustite sprožilec in izklopite oskrbo z zrakom pri kompresorju ali ventilu.
- Odklopite cev za zračenje : Vedno izklopite oskrbo z zrakom, preden preverite ali odstranite zamašek. To preprečuje naključno zagon.
- Skrbno očistite žam : Z angleškim ključem sprostite zaklenjeno delce. Nikoli ne udarjaj v vrtilnik s kladivom ali ga z rokami ne odvzemi, ker lahko to poškoduje vrtilnik ali povzroči poškodbe.
- Preverite za poškodbe po odstranitvi zamaška preverite, ali so bit, čak in zračne žleze poškodovane. Ne nadaljujte dela, dokler ne odpravite težav.
Nikoli ne poskušajte popraviti zastojanega ali okvarjenega vrta, medtem ko je priključen na oskrbo z zrakom.
5. -Prav. Varnostni ukrepi po uporabi
Po zaključku dela naredite naslednje ukrepe za zagotovitev varnosti in pripravite vrtilko za naslednjo uporabo:
- Izključite oskrbo z zrakom : Izklopite stisnilo in izpustite zrak iz cevi tako, da pritisnete sproščilni gumb vrtalke, dokler se vse tlak ne sprosti.
- Odklopite cevi : Odklopite zračno cev od vrtalke in jo uredno zvijte, da preprečite potrkanje.
- Poročajte o težavah : Če opazite kakršne koli težave (npr. puščanje, zmanjšana moč, nenadno hrup), takoj obvestite nadzornika ali servisno ekipo. Poškodovane vrtalke ne uporabljajte, dokler niso popravljene.
- Očistite in shranite OZI : Očistite svojo OZI (npr. pogumbe očistite očala, iztresite prašne maske) in jo pravilno shranite za naslednjo uporabo.
Koraki po uporabi preprečujejo nesreče med čiščenjem in zagotavljajo, da so težave hitro rešene.
Primeri iz prakse o vzdrževanju in varnosti
Primer 1: Zmanjšanje izpadov z rednim maščenjem
Gradbena ekipa je uporabljala pnevmatsko ročno vrtalo za popravilo ceste, vendar je opazila, da izgublja moč. Po pregledu so ugotovili, da je notranji bat suh in poškodovan zaradi redkega maščenja. Vrtalo je zahtevalo dragocene popravke, zaradi česar je nastal dnevni zastoj. Po uvedbi strogega načrta maščenja (dodajanje olja pred uporabo in vsako uro med delom) so se izognili nadaljnjim okvaram, izboljšala pa se je tudi zmogljivost vrtala.
Primer 2: Preprečevanje poškodb z ustreznimi OZV
Rudar je uporabljal pnevmatsko ročno vrtalo brez zaščite za sluške, saj je menil, da „kratkotrajna uporaba ne šteje“. Po tednu dnevnega vrtanja je razvil tinitus (piskanje v ušesih). Rudnik je uvedel obvezne preglede zaščite za sluške, zaradi česar ni bilo več poškodb sluha. Rudar je kasneje povedal, da čepi za ušesa zmanjšujejo utrujenost in delo olajšajo.
Primer 3: Podaljšanje življenjske dobe vrtala z rednim čiščenjem po uporabi
Ekipo za kamnolom so redko očistili svoje pnevmatske vrtalne stroje po uporabi, kar je povzročilo nabiranje prahu v hlajenjskih režah. Z dolžim časom so se vrtalni stroji pregrevati, kar je vodilo do pogostih okvar ventilov. Po začetku dnevnega čistnega reda z uporabo stisnjenega zraka in ščetk, so se zamaški v režah zmanjšali, in zamenjave ventilov so se v šestih mesecih zmanjšale za 70%.
Pogosta vprašanja
Kako pogosto moram mazati pnevmatski vrtalni stroj?
Mazajte z oljem za pnevmatska orodja pred vsako uporabo (5–10 kapljic v zračni vhod). Za daljšo uporabo (več kot 1 ura) dodajte nekaj kapljic vsako uro. Pred shranjevanjem dodajte olje in vrtalni stroj kratko časa pustite teči, da se notranje komponente prekrijejo.
Katera OZO je obvezna pri uporabi pnevmatskih vrtalnih strojev?
Najmanj: varnostne očala, zaščita za sluh (ušesni tamponi/ušesne školjke), močne rokavice, čevlji s kovinskim noskom in respirator (v prahastih okoljih). V gradbenih ali rudniških območjih je obvezna tudi varnostna čelada.
Kako varno odstranim zatik vrtalnega vretena?
Zaustavite vrtalno napravo, izklopite dovod zraka in odklopite cev. Za odvijanje zagoščenega vrtala uporabite ključ—nikoli rok ali pa ne udarjajte vrtalne naprave. Pred ponovnim zagonom preverite poškodbe.
Ali lahko za maščenje uporabim katero koli vrsto olja?
Ne. Uporabite samo visokokakovostno olje za pnevmatska orodja (razred ISO 32 ali 46). Motorjevo olje ali druge nadomestke ne smete uporabljati, saj lahko poškodujejo tesnila in zamašijo notranje komponente, kar zmanjša zmogljivost in življenjsko dobo.
Kako prepoznam, da moje pnevmatsko vrtalo za kamnine potrebuje strokovno servisno nego?
Znaki so zmanjšana moč, nenadna zvoka (brušenje/sopletje), preveliko tresenje, uhajanje zraka ali pogoste zagoščanja. Strokovno servisno nego naj načrtujejo vsakih 3–6 mesecev, odvisno od uporabe.
Kako naj dolgoročno shranim pnevmatsko vrtalo za kamnine?
Temeljito očistite vrtalo, namažite notranje dele, odstranite vrtalo in shranite v suhem in ohlajenem prostoru. Obesite ali postavite na stojalo, da preprečite vlažnost. Če ga shranjujete dlje kot en mesec, prekrijte s tkanino proti prahu, da preprečite nabiranje umazanije.